
Before you even get started with SEO, Pinterest, email marketing, or any other traffic building effort, there is one important thing you need to do first. Learn how to set up professional analytics for your blog.
With analytics, you’ll be able to answer questions like:
- How many people visit your website?
- On average, how many pages do users browse on each visit?
- What are your most popular posts?
- How are people finding your website (i.e. Google vs Pinterest vs Facebook)?
- What keywords do you show up for on Google searches?
- How often do people click your site when you show up on Google?
And those are just a sample of the questions you’ll be able to answer using analytics tools from Google.
The best news? These tools are completely free and super powerful! These are industry standard tools that even large companies use for their websites.
In this post, you’ll learn how to:
- Set up Google Analytics
- Set up Google Search Console
So, let’s get started!
What is Google Analytics?
Google Analytics is the tool that shows you how your site is actually being used.
With Google Analytics, you’re able to see where your traffic comes from and what people do on your website once they’ve arrived.
You can use Google Analytics to view your traffic trends over a specified time period (i.e. day, week, month or year.)
It’s also great for comparing two time periods to see if and how traffic to your website has changed over time.
Google Analytics is essential for understanding how visitors actually use your website.
What is Google Search Console?
Google Search Console is most powerful for showing you how your site performs on Google search.
Here are a few of the things Google Search Console will show you regarding search performance:
- The keywords searchers use to find your blog
- Average search position for certain keywords
- Number of times your site appears (impressions) in real Google searches
- Click-through-rate for specific keywords (how often someone clicks a link to your site on when you show up on Google)
It will also help you tremendously with technical SEO. If your site has any crawl errors, Google will help you uncover and correct them.
Google Search Console is essential for understanding how your site performs on Google Search.
Not sure what terms like crawl errors or search impressions mean? No worries!
Sign up for my FREE 5-Day SEO for WordPress course to get started optimizing your blog for WordPress!
How to Implement Google Analytics on WordPress
The first thing you need to do is sign up for your free account on Google Analytics.
Note: I’m assuming most of you already have a free Google account. If you don’t simply sign up for one before moving on in this tutorial.
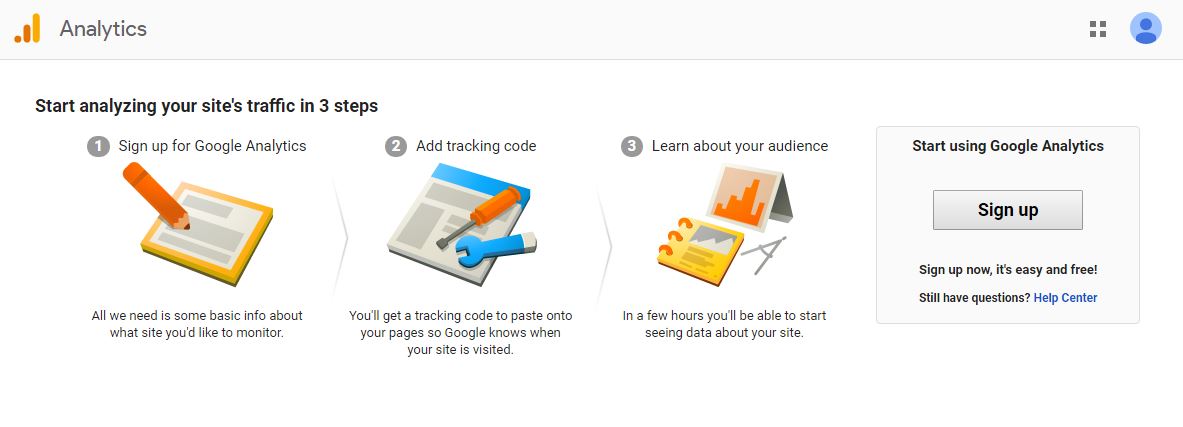
If this is your first time setting up Google Analytics you’ll probably see a screen similar to the below screenshot. Simply click Sign up to get started.
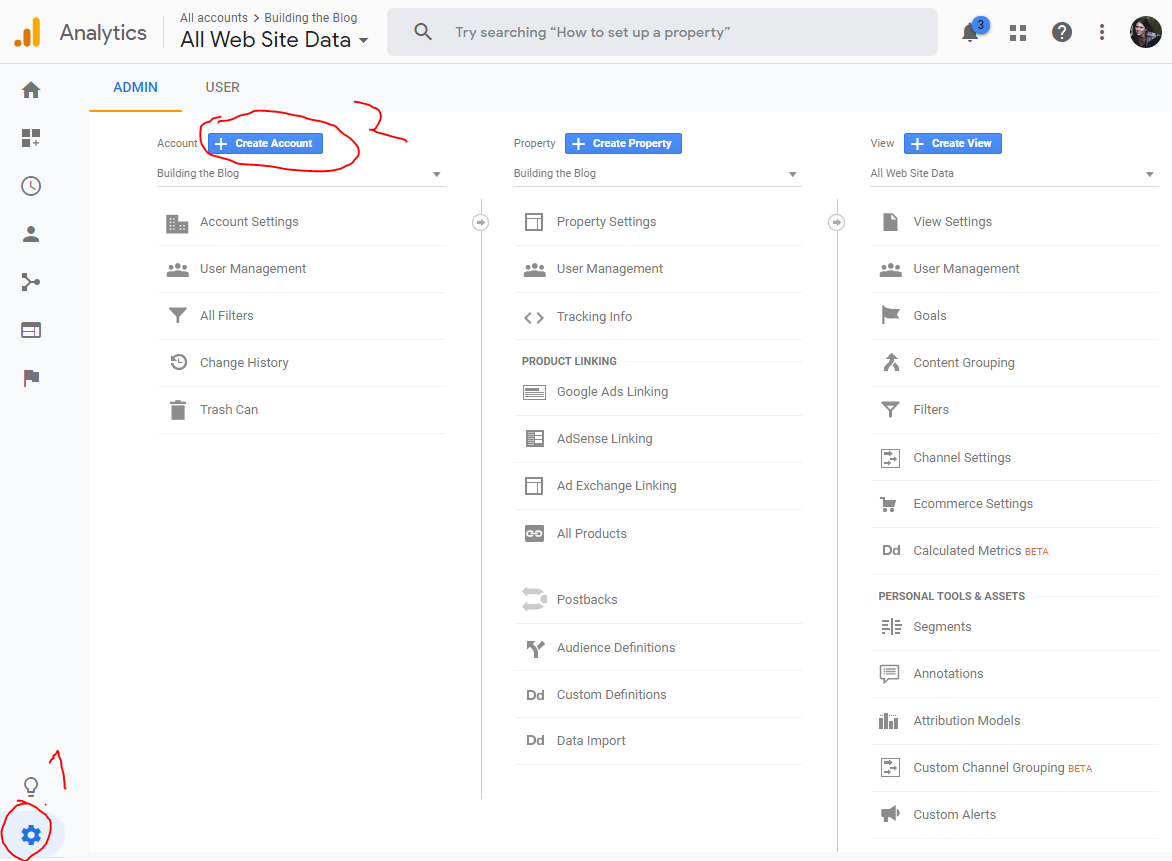
If you have used Google Analytics before, the first step of the process is slightly different. Here’s what you need to do instead…
Click the gear icon in the bottom left of the screen, and then click “Create Account” for your new website.
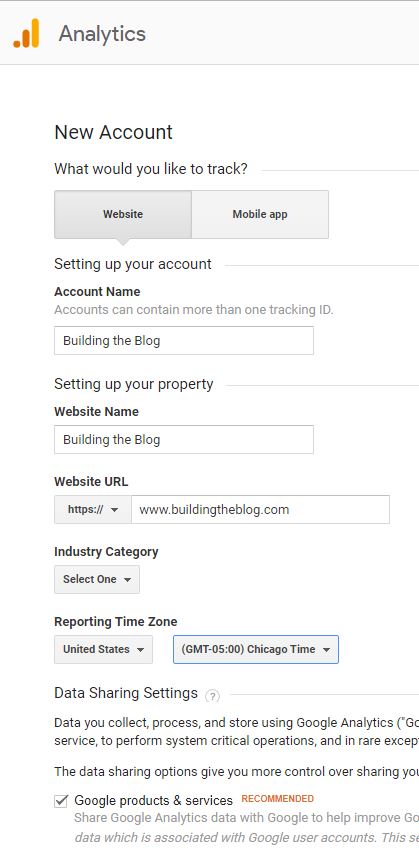
Now, it’s time to set up your new website’s account.
You’ll see that I typically give my account name and website name the same name.
Other than that, filling out the form is pretty self-explanatory…
Quick Aside:
Your account can have multiple properties. This is typically for if your website has sub-domains hosted on different servers. For example, some bloggers choose to create landing pages on third-party websites and they might need a different tracking code for this purpose.
This is not something you need to worry about right now, more of an FYI.
Once you’ve filled out your account details, you’ll be presented with a tracking code.
Keep this website tab open. You might need to copy (Ctrl + C) this code into WordPress to integrate Google Analytics with your website depending on which of the integration methods you choose.
Now that you have a Google Analytics Account, you still need to link it with your website.
There are two basic options for easy-integration:
- Using a lightweight plugin that requires more manual work
- Using a heavyweight plugin that requires access to your Google account
Some premium themes, like Divi, have an easy way to add the tracking code to your website, but in most cases, the easiest thing to do is to use a plugin.
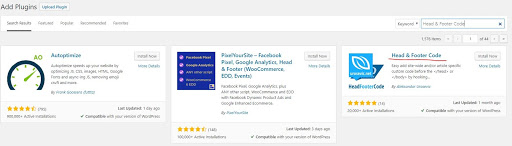
Option #1 Lightweight Plugin: Head & Footer Code
I personally prefer a lighter weight option for implementing tracking codes.
You could edit the header.php code yourself, but I find that a simple plugin for adding tracking codes to your header is much safer and simpler for non-technical bloggers.
In this example, I’ve downloaded the plugin Head & Footer Code.
This plugin is great because it doesn’t constantly advertise its premium version to me like a lot of other plugins out there.
You can also use this plugin to implement any other tracking code for sites, such as Pinterest or Facebook, in the future.
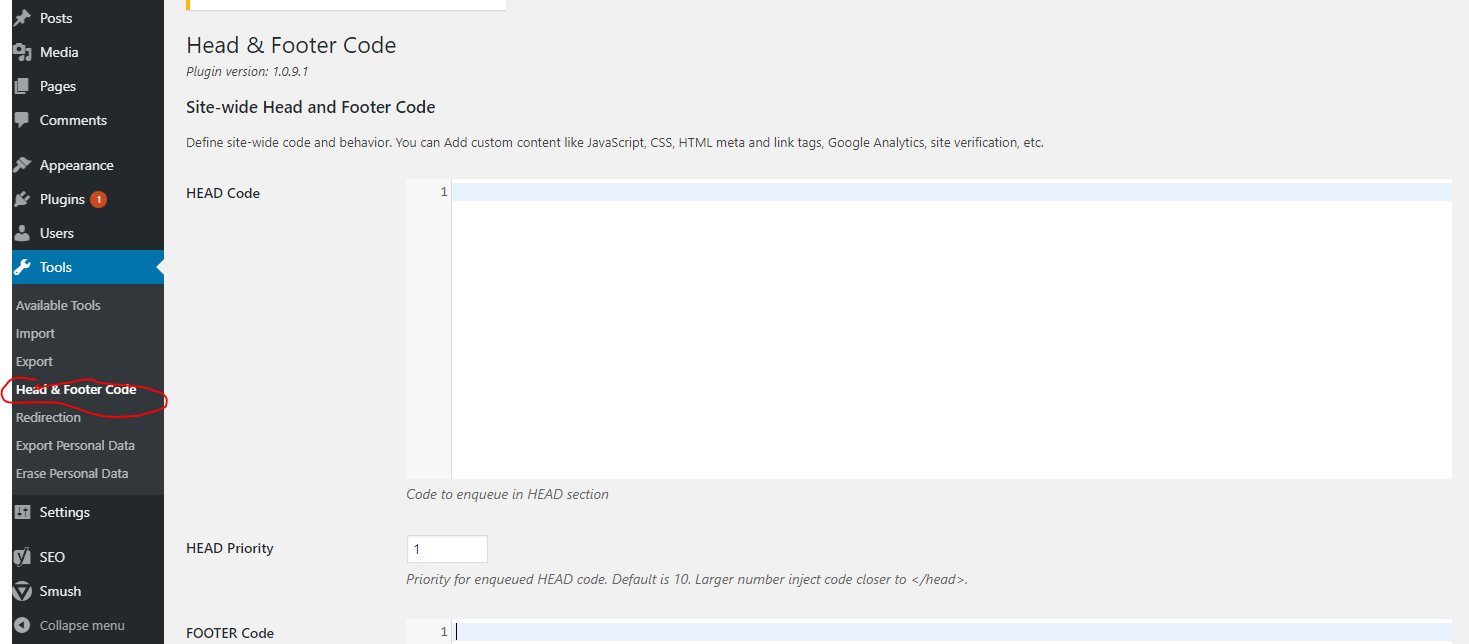
After installing Head & Footer Code, navigate to Tools > Head and Footer Code.
From here, simply copy and paste your Google Analytics tracking code into the HEAD code section. Scroll down and then hit Save Changes.
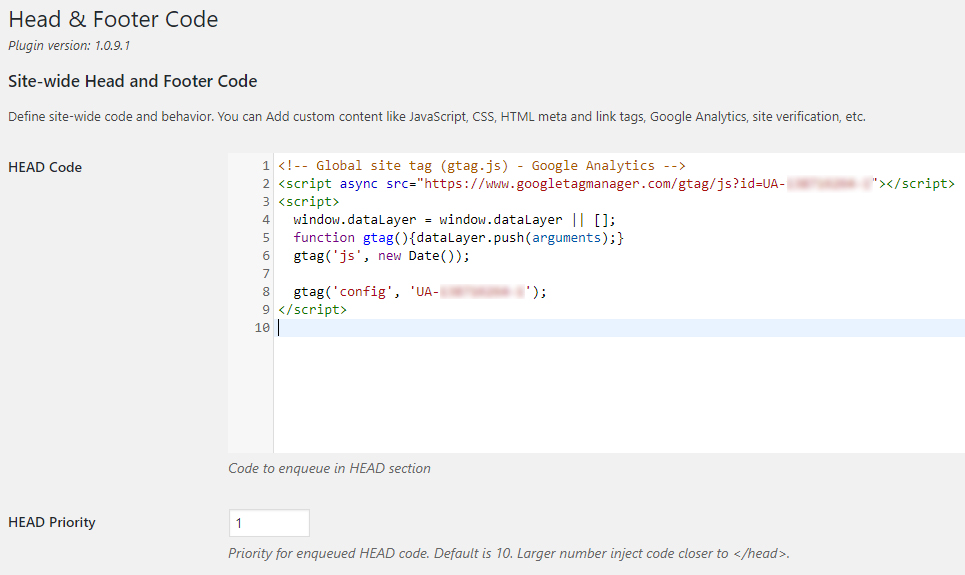
Now, you’re good to go! Google Analytics is installed on your WordPress website.
Option #2 Heavyweight Plugin: MonsterInsights
Many bloggers rely on a plugin embedded in their site to view and manage their website’s analytics.
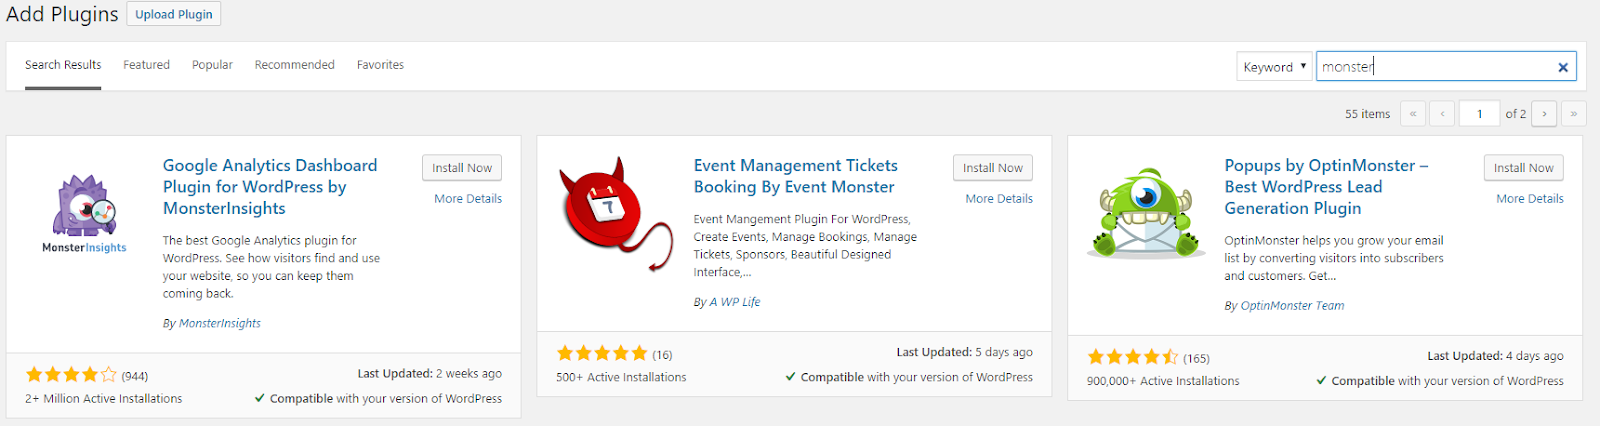
The most popular of these plugins is Google Analytics Dashboard Plugin for WordPress by MonsterInsights.
I personally prefer to remove the middle-man and stick with using Google Analytics and Search Console to manage my site.
But, MonsterInsights is a much easier way to install Google Analytics onto your website, so it’s a great option if you’re non-technical blogger!
The first step to using MonsterInsights is to install and activate the plugin on your WordPress website.
Once the plugin is installed, click Insights > Settings to get started with adding your analytics code.
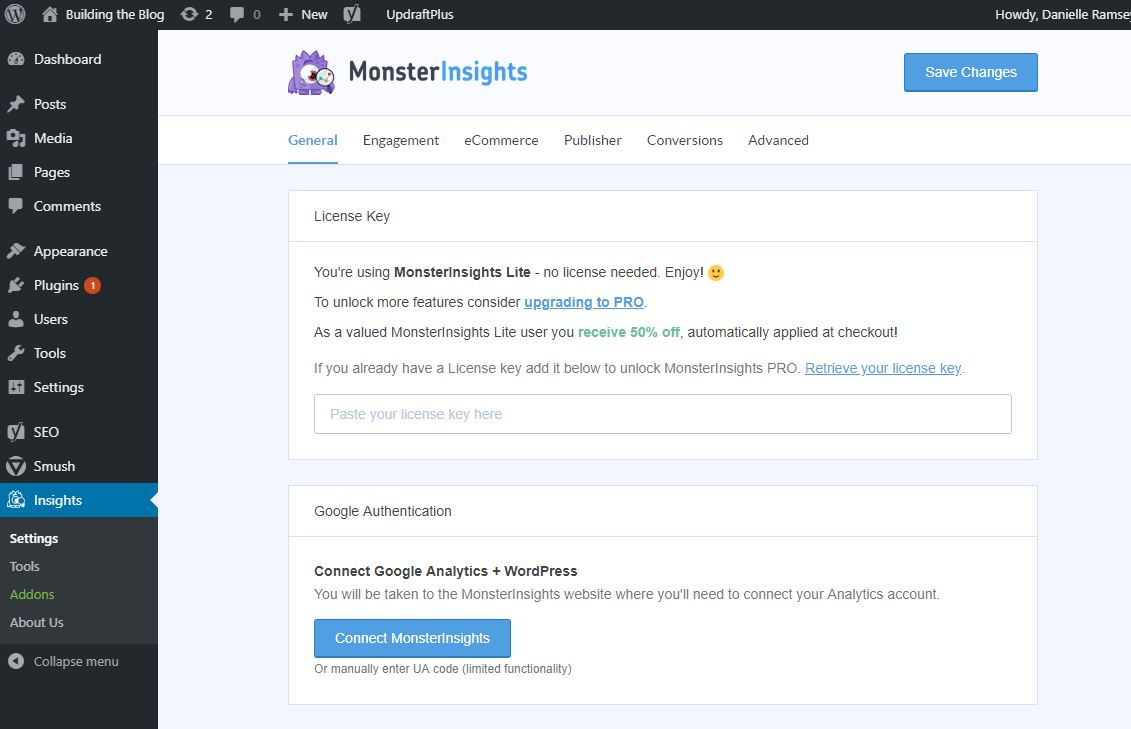
There are two options for connecting your analytics account.
One is to give MonsterInsights access to your Google Account and allow them to manage your Google Analytics connection to your blog.
The second is to simply past your analytics ID code. This will limit functionality, but keep your Google Account private from the plugin.
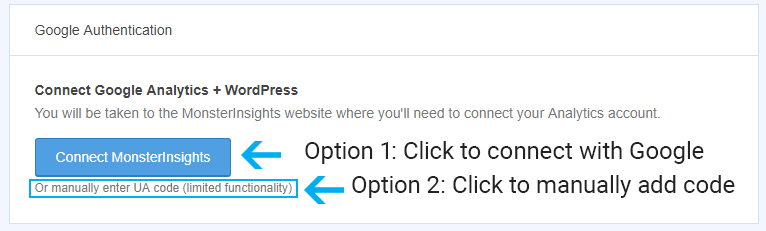
To go with option 1, click the blue button that says ‘Connect MonsterInsights’.
This will open a simple wizard to connect to Google.

As you follow these prompts you’ll eventually have to get MonsterInsights access to your Google Account to manage Google Analytics and Search Console.
If you choose this option, make sure you use the same Google Account you used to setup Google Analytics in the previous step.
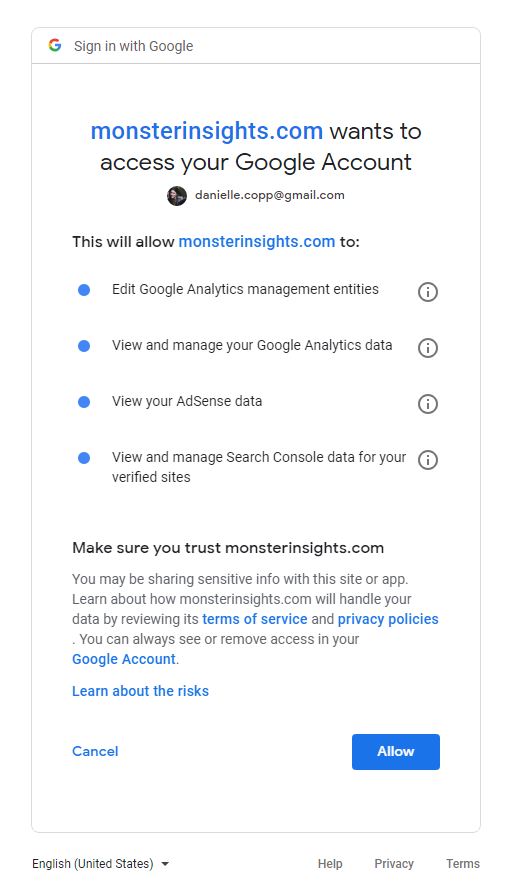
Whether or not you choose to allow access is up to you. If you’re not sure, you can still use the manual method.
You’re also able to remove access at a later time if you choose.
If you do choose to allow access, the final step is to choose the Google Analytics account you’d like MonsterInsights to manage.
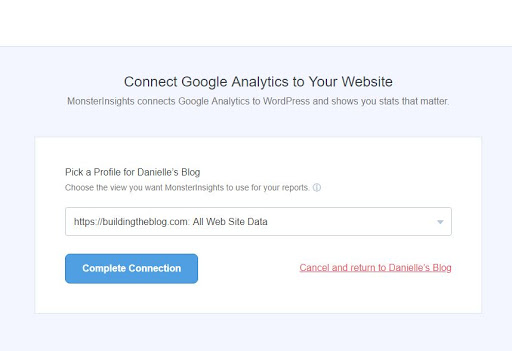
Click “Complete Connection”, and you’re done!
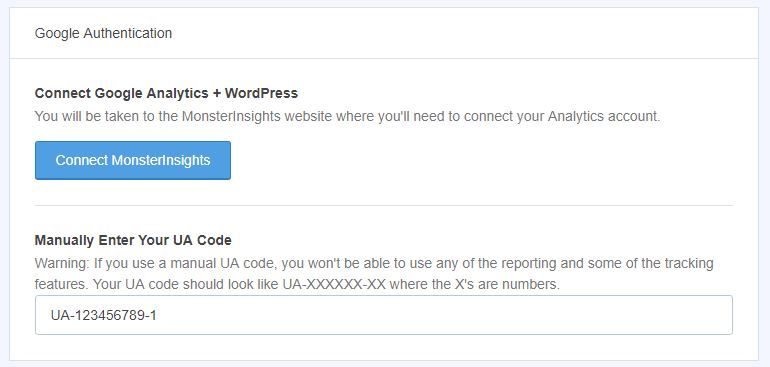
The second option is to connect MonsterInsights with your Google Analytics account by manually copying your tracking ID.
This is my preferred option just because I try to limit giving third-parties access to my Google account.
To utilize this option you need to go to the MonsterInsight dashboard and click the text ‘Or manually enter UA code (limited functionality).’
This doesn’t look like a link, but it is one.
Now, you go back to Google Analytics and copy only your tracking ID.
This is different than your overall tracking code and is the text on the top left of your tracking code page.
Now, simply copy and paste this code into MonsterAnalytics and save your changes.
After completing one of the above two options, you’re ready to go with Google Analytics!
Now, let’s set up my favorite analytics tool, Google Search Console.
How to Implement Google Search Console for Your Website
To get started with Google Search Console visit the site, and then click ‘Start Now.’
If you’re completely new to Search Console, you’ll see this screen:

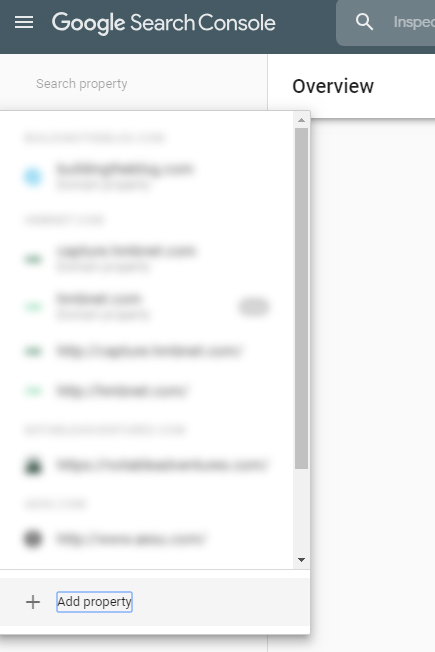
If you happen to have other websites connected to your Google Search Console already, you’ll want to add a new ‘Search Property’ to your account.
Do this by scrolling down the left sidebar and clicking ‘Add Property.’
Google Search Console Verification Method – Which to Choose?
From here, you’ll have two options for adding your domain.
- Option 1: Domain
- Option 2: URL prefix.
If you don’t have Google Search Console connected to any websites already, this will be your first step.
This screen is a little confusing. In general, the Domain connection method is the better method, but it’s more complex to set up.
URL prefix is very easy to setup, especially if you’ve already setup your Google Analytics account using the Google account.
If you’re afraid of doing anything techie, the URL prefix is right for you.
But, if you’re okay with getting your hands a little dirty, the Domain method provides more accurate results.
Google Search Console Verification: Domain Method
If you chose the Domain method, you need to make sure you’re able to edit your DNS records.
This means you need to have purchased a domain (i.e. yoursitename.com) through a website like Bluehost or GoDaddy.
If you do own your domain, continuing by adding it without a www. or https:// in the text box and hit continue.
Next, you’ll be presented with a TXT record to enter into your DNS configuration.
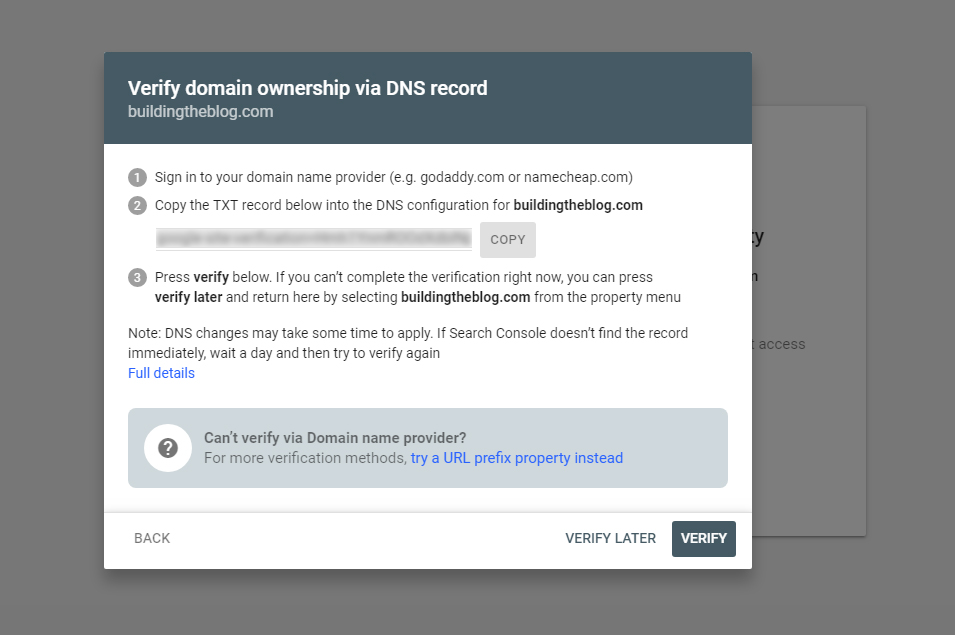
Google provides detailed instructions for how to do this on virtually all domain provider websites.
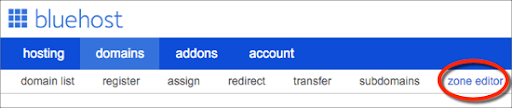
Click here to access these instructions. Below is an example of how you’d do this on Bluehost, the process is similar for most other providers.
After logging into Bluehost, you’ll need to access your domains > zone editor.
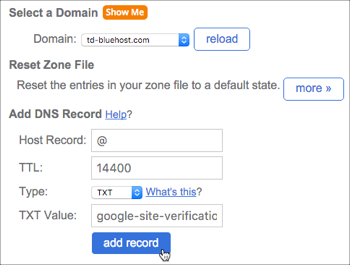
Now, find the add DNS Record section.
Click the Type drop-down list. Then select TXT. Set your host record to ‘@’, your TTL to 144000.
Next, copy and paste the unique TXT record from Google into the TXT Value input.
Finally, select ‘add record’.
Now, go back to Google Search Console and click Verify.
A lot of times this process is instant. However, it can also take up to a day to process the TXT record, so you may need to be patient.
Google Search Console Verification: URL prefix method
The URL Prefix method is a great option if the DNS method is too complicated for you, or you can’t edit your DNS records.
Option 1: Google Analytics
If you’ve already connected your blog to Google Analytics, then you should be able to verify Google Search Console with your Google Analytics account.
This is the simplest method. If you’re already set up on Analytics, all you should need to do is hit “Verify.”
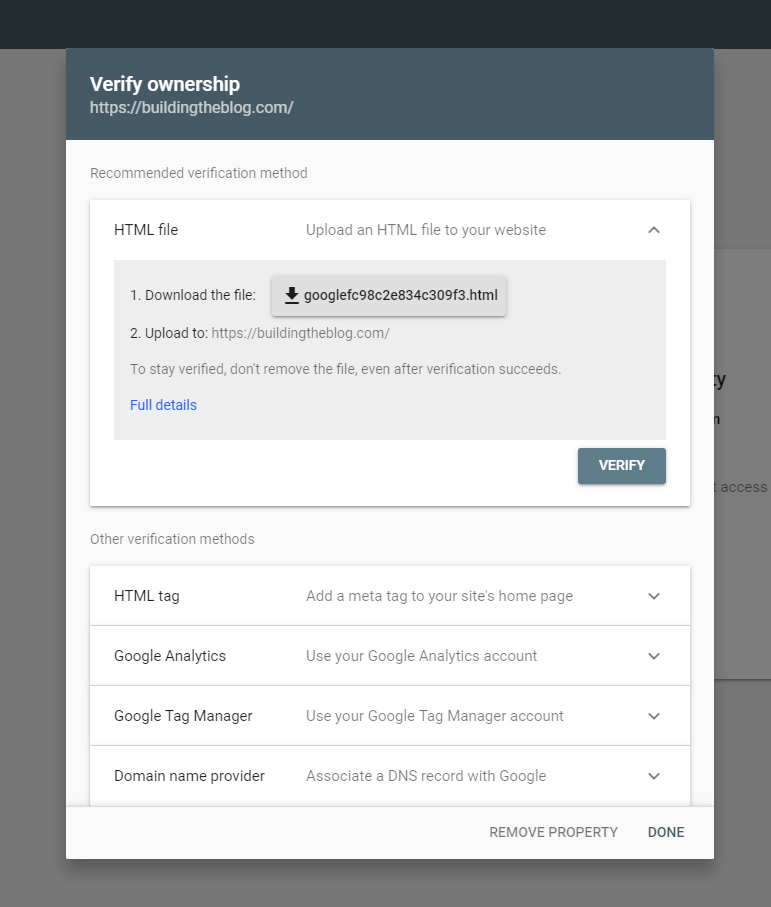
Option 2: Upload HTML file
If you know how to access and use a file manager, you can simply download a verification file to the root folder of your site.
However, if you don’t know how to do this, options 1 and 3 will probably be easier to manage.
Option 3: HTML tag
Using a plugin like Head & Footer Code you can simply copy and paste this tag into the HEAD section.
If you chose to implement Google Analytics with the Head and Footer Code plugin, simply paste the search console tag code underneath your Google analytics tag.
There are a few more options, but they’re more advanced and not methods easy for beginners. I would not recommend them.
What do you do after setting up analytics?
If your blog is completely new, don’t expect instant traffic to your website. It will probably take a few months for Google to crawl your website and not see it as spam.
I know this can seem discouraging if you’re a new blogger – but don’t worry – you’ll be getting organic traffic before you know it.
While you wait for your organic traffic to payoff, make sure you’re doing organic keyword research and creating content that people are actually searching for and that isn’t super-competitive.
Finally, once you start seeing traffic on your website, check out my post on how to use Google Search Console to boost SEO traffic.